It’s just gone 5:00am where I am in Seattle, WA. I fly home later tonight after soaking up a week with thousands of other members of Microsoft’s technical community at an internal event called TechReady. Needless to say, the content shared is highly confidential but is motivating, inspirational and truly awesome. It’s as a result of this shot of technical excitement that I decided to build a Q&A chatbot. What’s even better? I did it in less than an hour with zero code and so can you! Read on to find out how…
Disclaimer
I am not a proficient developer. In fact, I find code scary. I can be dangerous with HTML, CSS, Python, and I’ve even been known to toy with VisualBASIC and C# in the past but one thing I don’t call myself is a developer. This is important to note because when I first looked at this I naturally assumed it would be technically complex, time-consuming, and require a PhD in machine learning. As you’ll see, it doesn’t.
I’m expecting to update this post several times with more context and detail. When I built the chatbot I didn’t have writing a blog post in mind and therefore didn’t write out the steps or take screenshots. Since a few people have asked how I did it, I’m writing it up. There may be gaps, and if there are please let me know in the comments.
Lastly, the chatbot I’ve built is rudimentary. It’s awesome and fully working, but to take it to the next level I can see the need to start adding some custom code and development. I provide what I did here purely “as-is” to help you get started.
Introducing my chatbot: jamesbmarshallbot
I needed a purpose to build a chatbot, and since I’m often asked fairly simple and common questions and am often setting an “OOF” (Out of Office) response I thought that a “virtual James” that people could ask questions of would be a great proof of concept and might even help keep my inbox manageable whilst I’m out with customers and partners.
Ways to interact
Right now you can speak to the chatbot in three main ways:
- Skype - as a contact you chat within the client.
- Microsoft Teams - as a bot you chat with via the web or desktop app.
- Web chat - a simple web portal chat interface.
It’s actually very simple to support channels like FaceBook Messenger, Slack, Telegram and even services like Twilio but I haven’t activated those for now.
You will need...
Actually, you won’t need very much but here’s a list that might help:
- An Azure subscription. Don't worry if you don't have one, you can get £150 of free credit by signing up for a trial.
- Questions. This isn't strictly required, but if you have a bunch of URLs to FAQ pages it's very easy to train the chatbot on those questions automatically. As you'll see, you can add your own but a pre-existing bank of "question and answer pairs" can save some time.
- Refreshments. Diet Coke is my preference, but grab yourself a drink.
High-level Steps
I will cover these steps in more details as I update this post. In summary, the steps you’re going to take are:
- Create the initial Q&A bot using QnA Maker.
- Train the Bot with pre-existing FAQs and customer questions, and we'll test to make sure they're being answered correctly.
- Create a Bot using the Azure Bot Service (in preview), to which we'll hook up the Q&A chatbot we just made.
- Configure the Azure Bot Service and Q&A Bot to work together, it's a few clicks and some copy-and-paste.
- Configure Channels for the chatbot to be interacted with.
- Start chatting!
- [Optional] Create an Azure Web App to host a simple page with the web chat embedded in it.
At a high level, it’s “as simple as that”. You can chat to mine if you like! Some questions to ask:
- "How are you"?
- "What is CSP?"
- "Are you single?"
I’ve built mine to have learned from the CSP FAQ. In theory, any of the questions there should get an answer from the chatbot. My next task is to go through and re-train the chatbot to understand more “natural” questioning, and of course, add more question-and-answer pairs to make it even more useful!
Creating the Q&A chatbot
The first step is to sign up for the QnA service. Once you’re in, head to “Create new service”. You should see a simple form to fill in that looks like this:
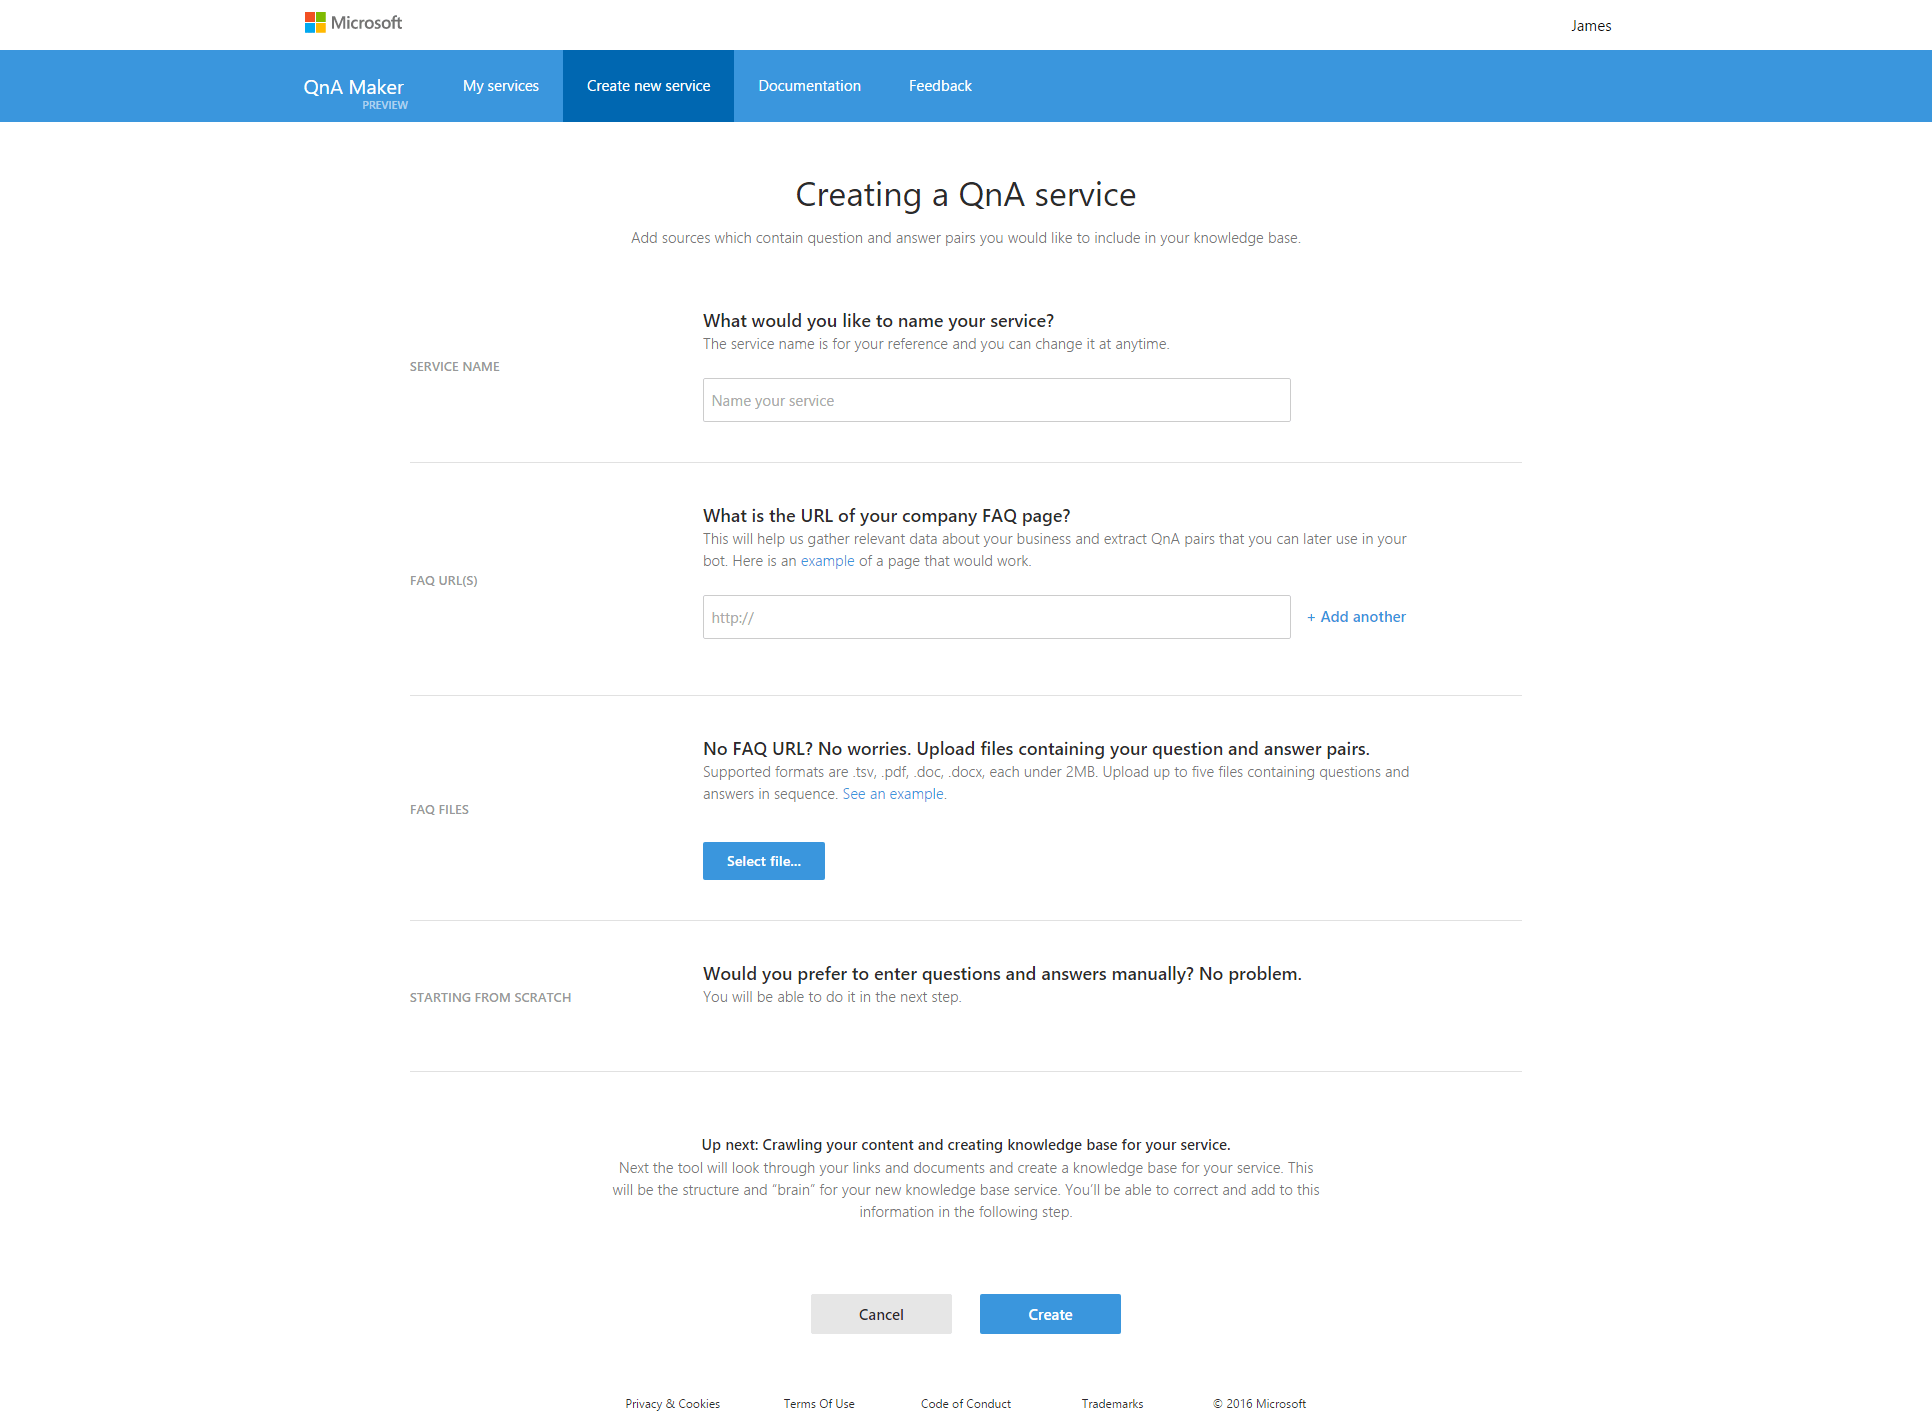
If you’ve got an existing FAQ page / pages that you want to include as part of creating the bot then you can list them out in the form. This saves a huge amount of time and means you have a great starting point from which to train your chatbot. You can also upload up to 5 files to the service if you have them stored in a .tsv, .pdf, .doc, or .docx format.
Training and testing the chatbot
After creating the bot, you’ll be able to view all the question & answer pairs that have been detected. This view below shows the ones picked up from the CSP FAQ page. There are over 200 pairs!
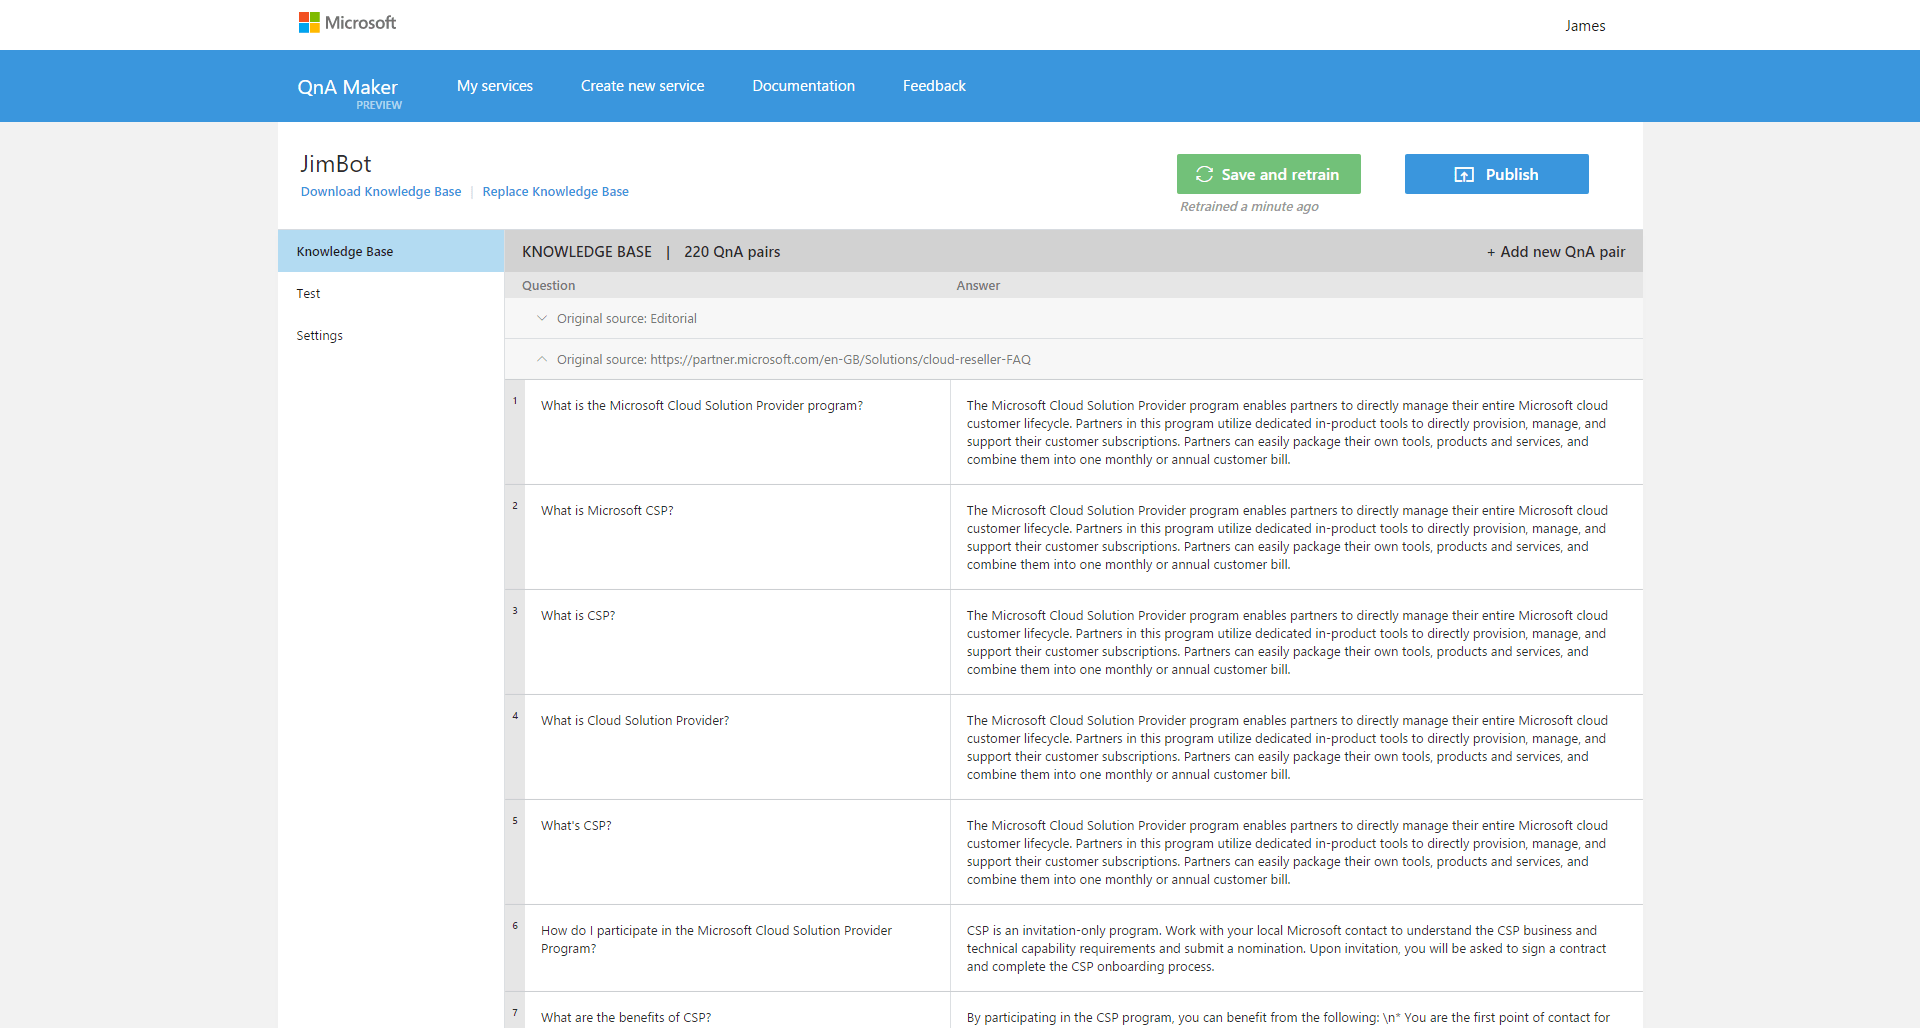
It’s here that you can remove any questions that you don’t need, add extra ones, re-word any answers and change the question language to be more “natural”. Once you’re happy with the questions you can click “Test” (on the left side of the screen) to start interacting with your bot!
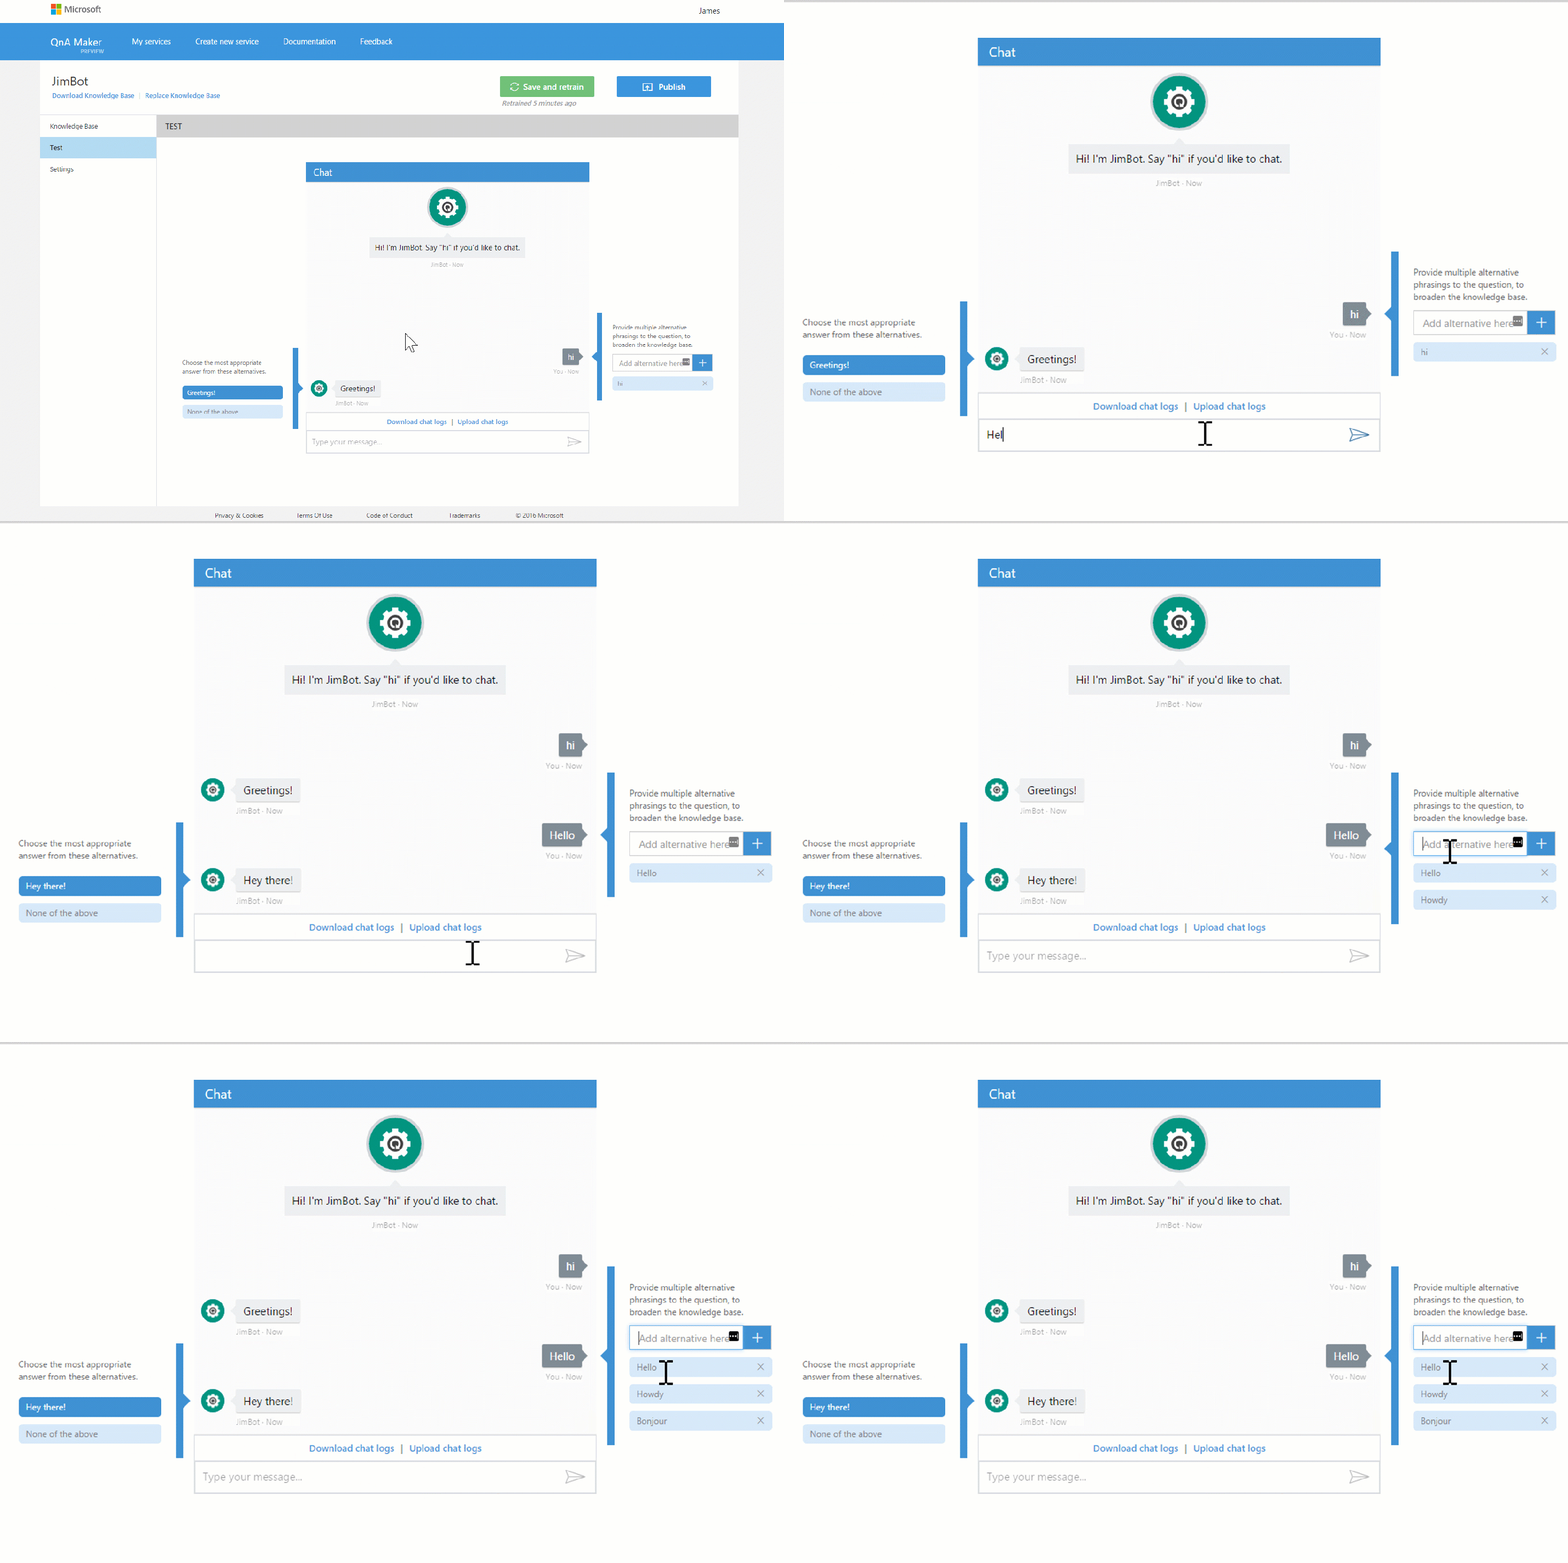
The interface is quite intuitive and you can make edits to questions and answers on the fly. I found this particularly useful as I’d type questions in a “real life” fashion, and if I didn’t get the answer I was expecting I could correct it immediately. Just remember to click “Save and retrain” to implement your changes!
Creating an Azure Bot Service
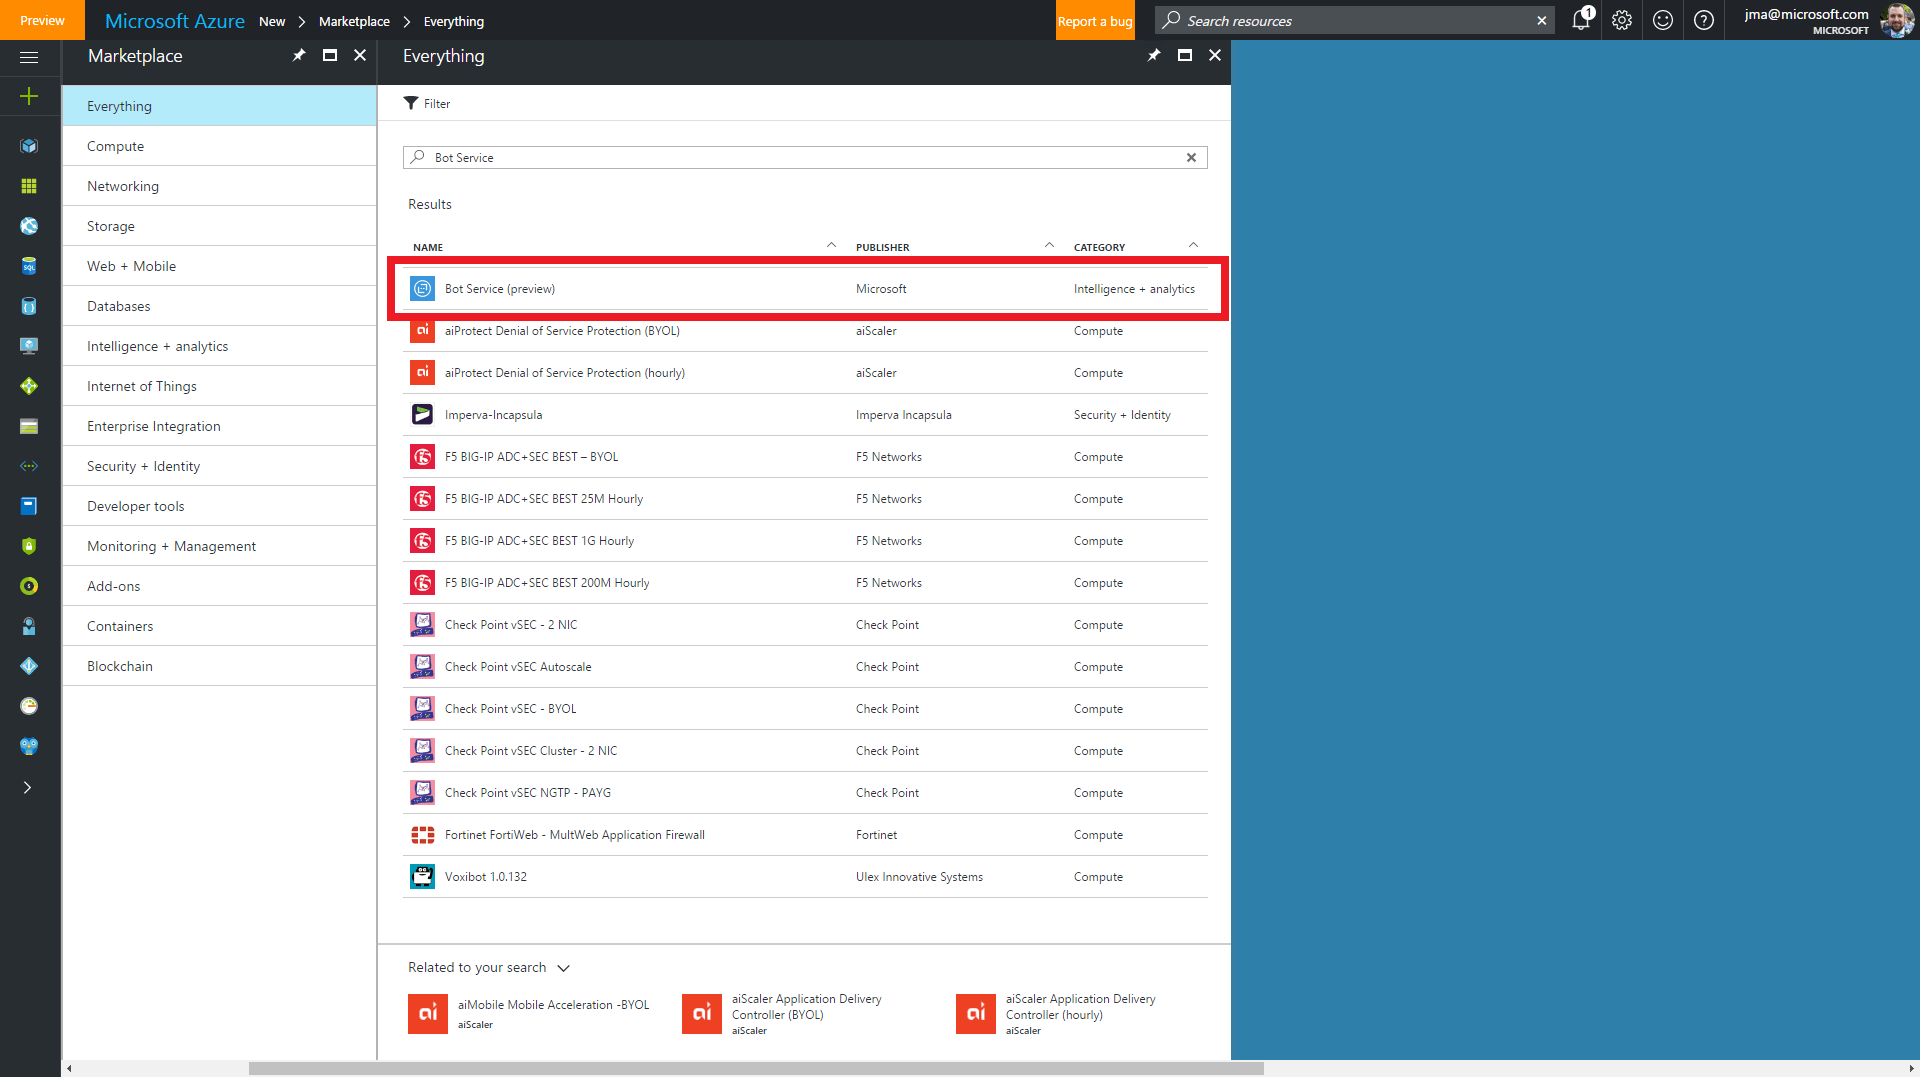
I’ll assume that if you’re this interested in creating a bot you’ll have signed up for an Azure subscription or you’ll have an existing one that you can use. If you don’t, you can get £150 free Azure credit by signing up. Once you’re into your Azure portal, create a new Bot Service by searching the Azure marketplace for “bot service”, you should see it listed in the results:
Follow the wizard to create the service, noting that you can add it to an existing Resource Group or create a new one. Once provisioned, navigate to the chatbot service where you’ll see that you need to configure your App ID unique keys.
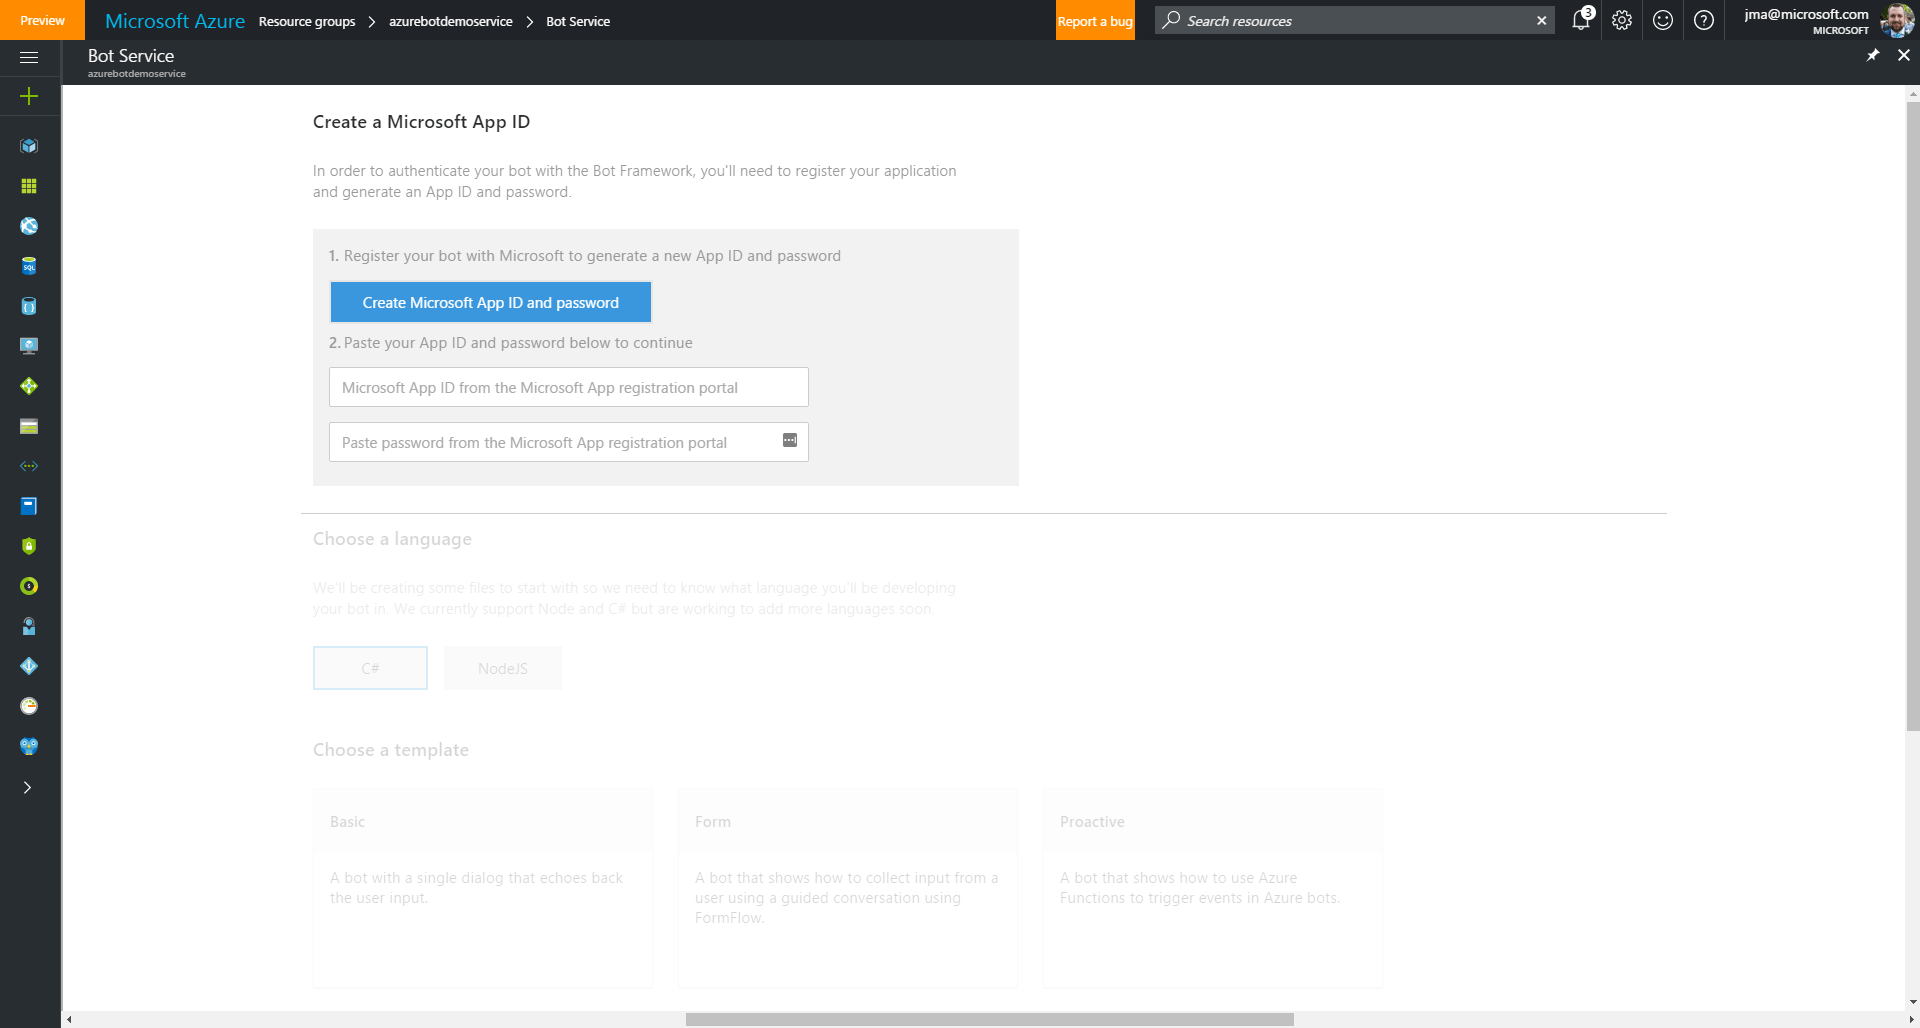
Again, follow the guides here - they’re very simple and just involve some copy and pasting into the right window. I’m not sure why this isn’t simpler, but I’m sure in time this won’t be such a faff! Once you’ve configured your App ID you’ll find the greyed out content activated and you’ll want to select “Question and Answer” from the array of options.
This should pop up a box that’ll allow you to select your QnA Maker bot:
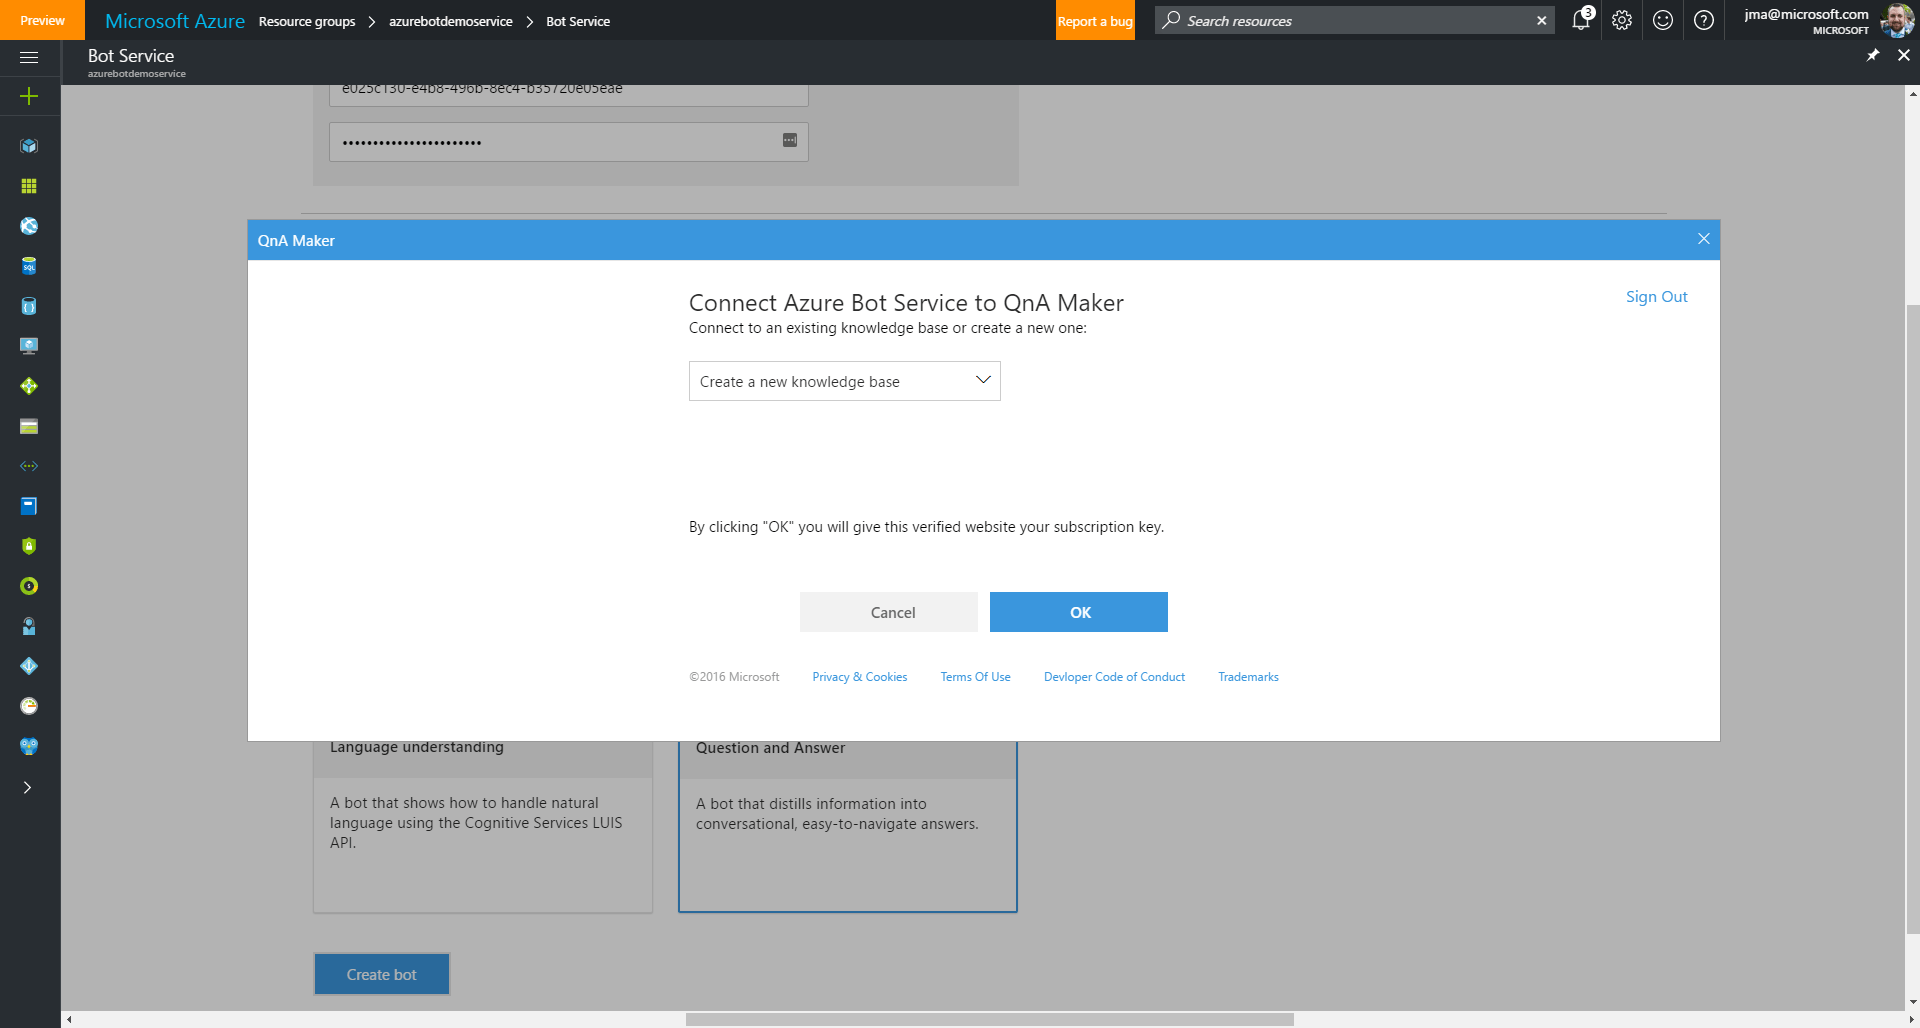
Configuring the channels
Once you’re connected up you’ll go to the Bot Service configuration page that’ll default to the code view. Don’t worry, this is a zero code walkthrough so you won’t need to fiddle here (unless you want to!). We’re interested in the “Channels” tab:
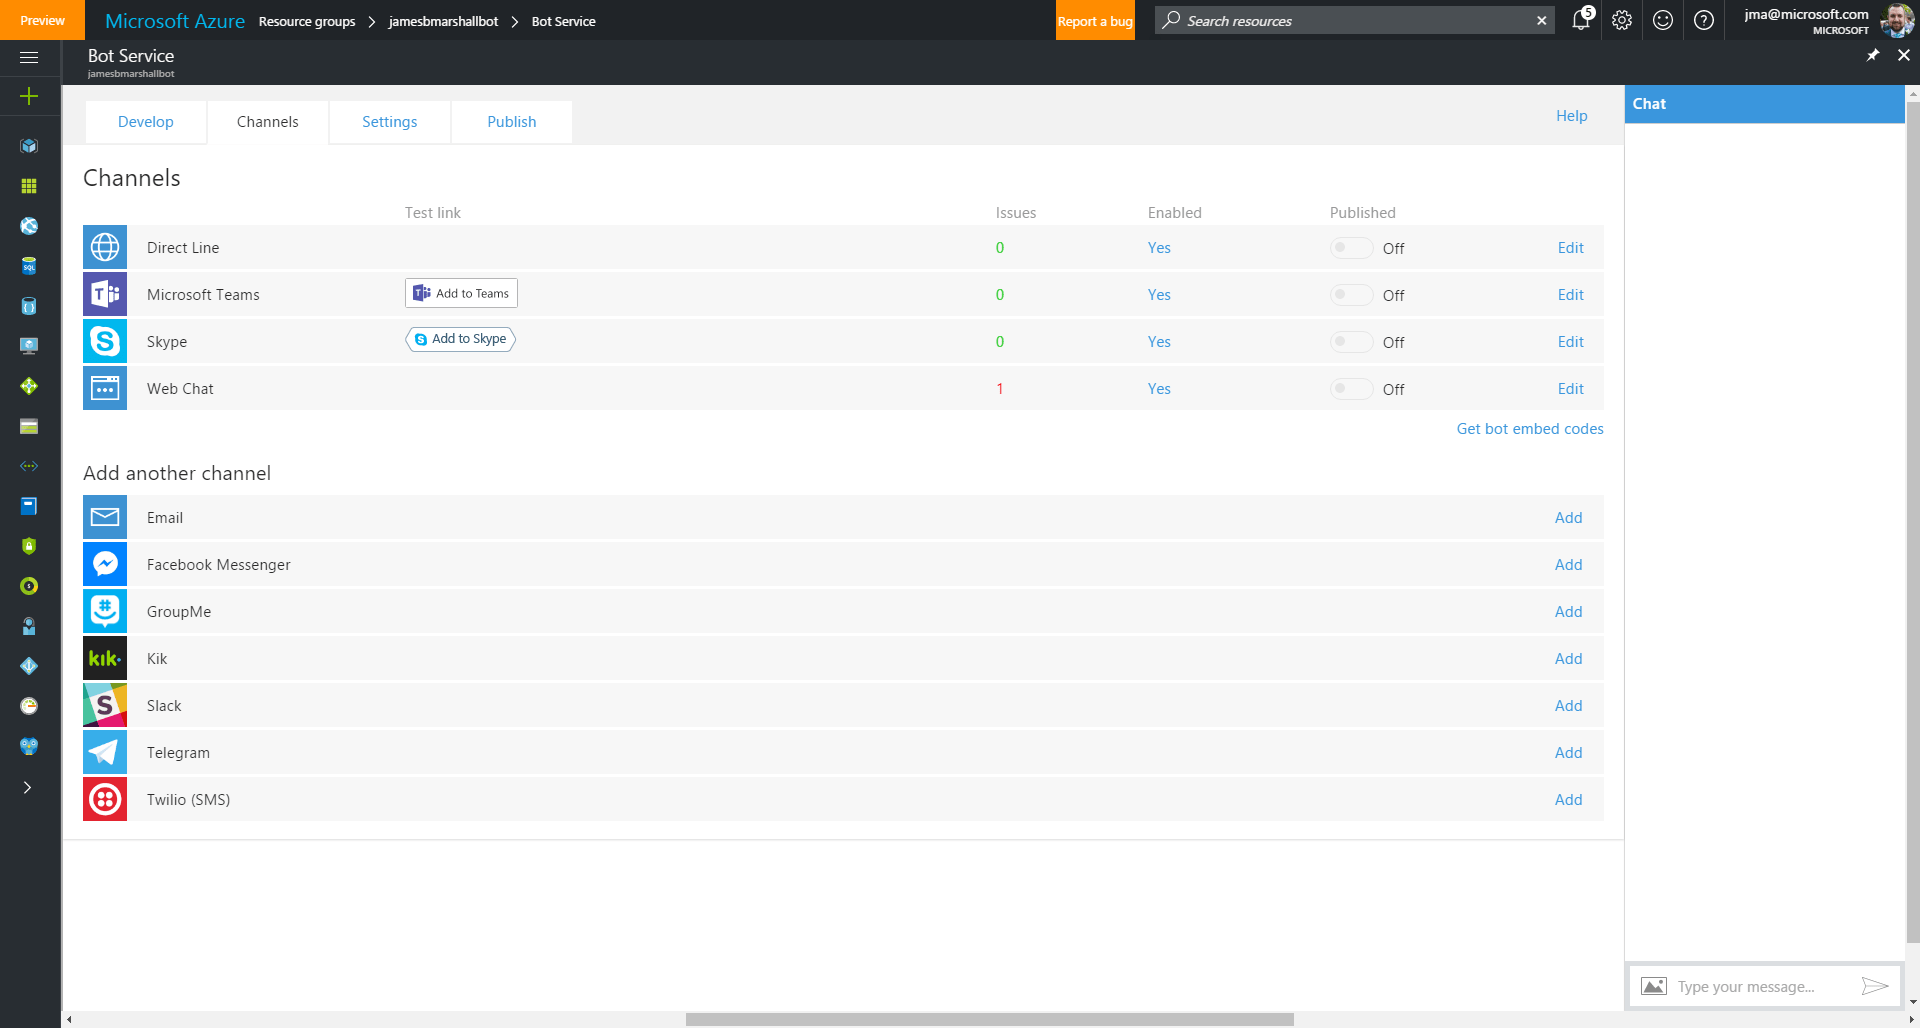
Since I’ve already built my chatbot, a number of channels are already activated. It’s in this section that you can select which channels you want, and turn them on or off as required.
Start chatting!
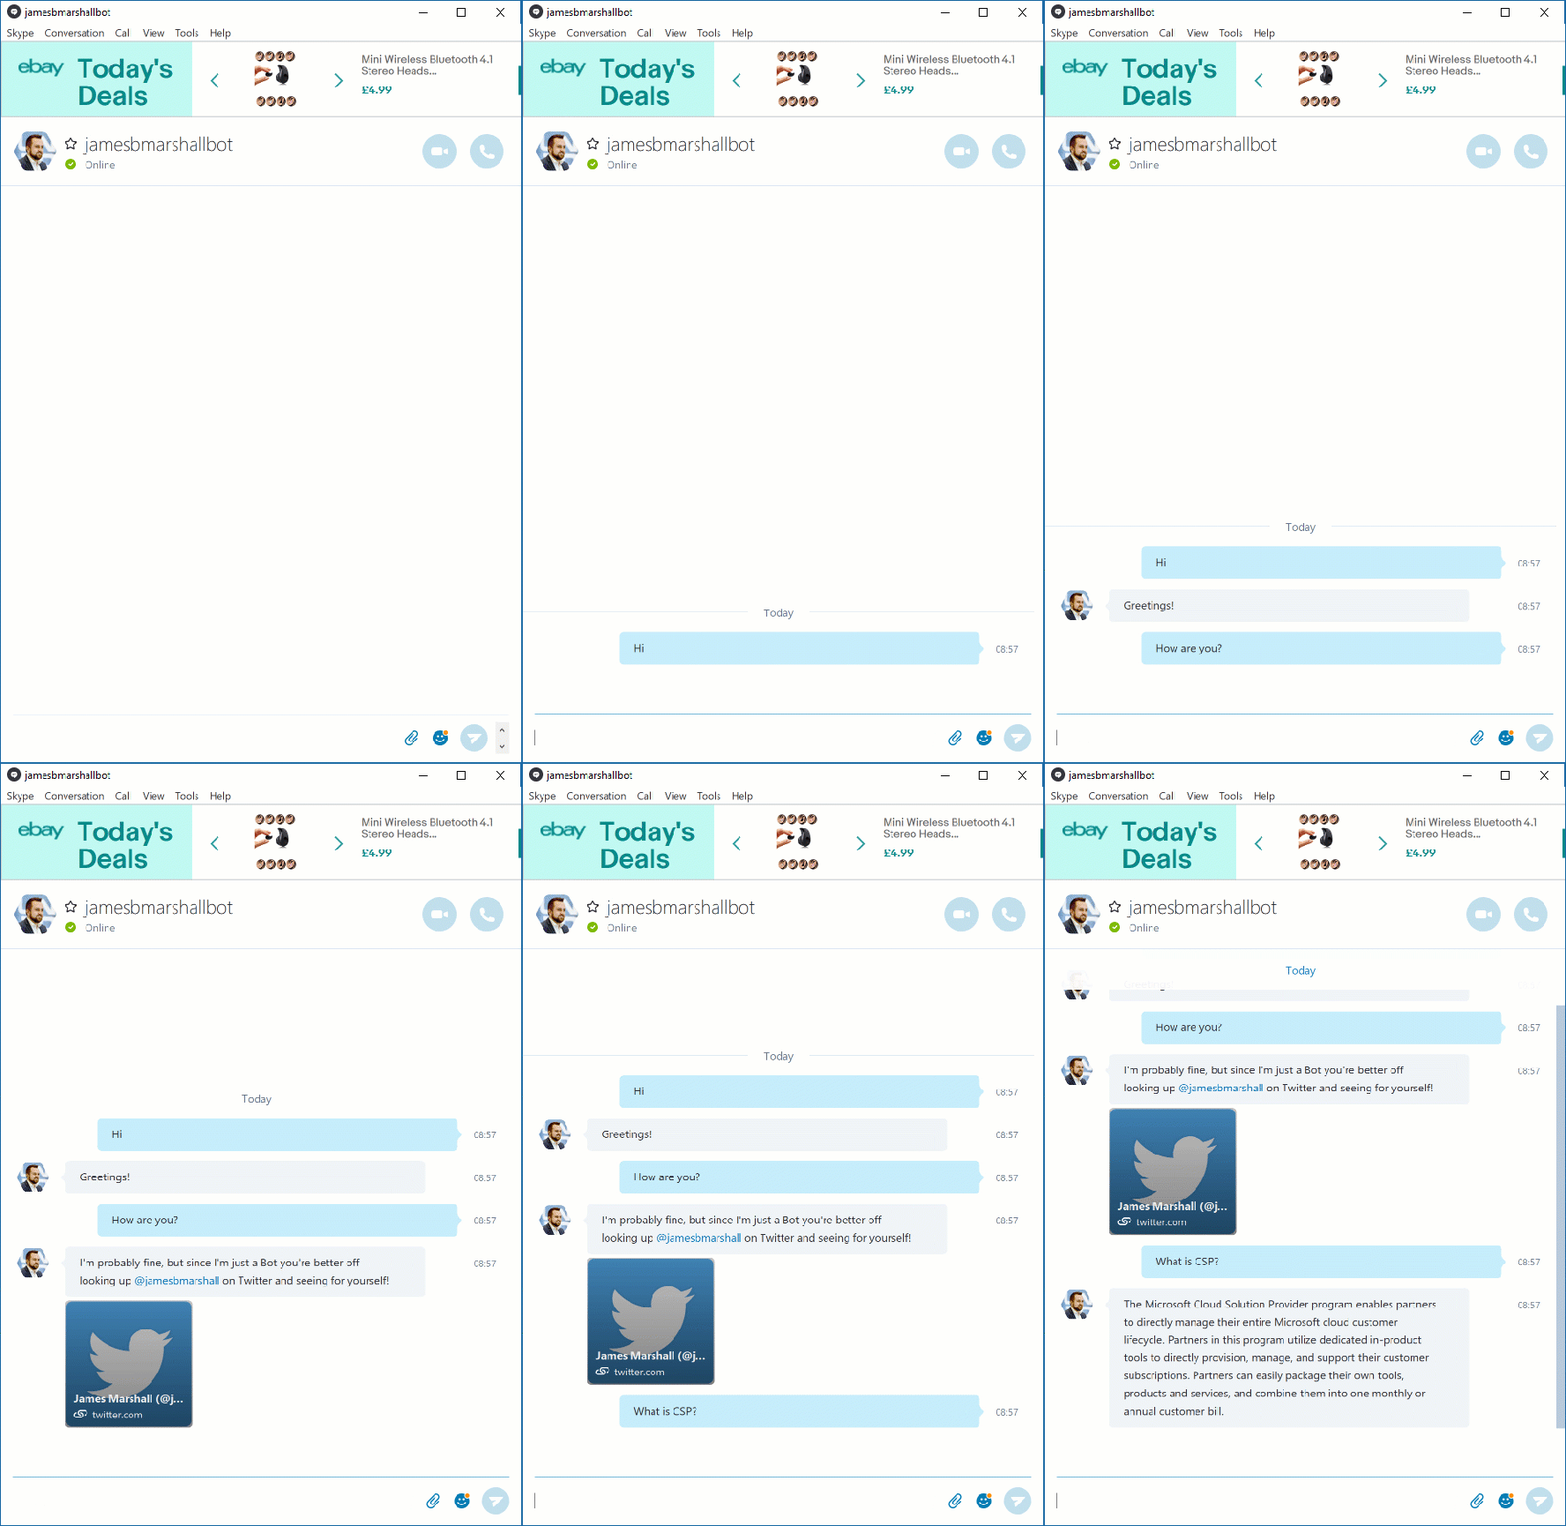
You don’t actually need to publish your chatbot to start interacting with it through your favourite channels. If you just want the chatbot for private or internal use then you can leave it unpublished; however, if you want it for public access, listing in directories etc. then it’ll need to be subject to a quick review by Microsoft to ensure it meets the review guidelines.
Further Reading
It goes without saying that I’m not a genius. I did reference some online materials to help put this all together:
- Create Bot from FAQ page with no coding - a little light on detail, but the last step helped me make the bridge between QnA Maker and Azure Bot Service.
 6 minute read